

Thinking about adding a deck to your home? That’s awesome! It’s a great way to enjoy the outdoors. But before you start dreaming about BBQs and patio furniture, there’s a step you can’t skip: getting a permit. It might seem like a pain, but it’s super important for making sure your deck is safe and legal. This guide will walk you through exactly how do I get a permit to build a deck, step by step, so you can get that deck built without any headaches.
Key Takeaways
- Most deck projects require a permit because they connect to your house and often exceed certain size or height limits.
- You’ll need to check your local building department for specific requirements, which usually involve submitting detailed plans and an application.
- Prepare your application thoroughly, including site plans and construction drawings, to avoid delays or denial.
- After submitting your application and paying fees, your plans will be reviewed, and you may need to schedule inspections during and after construction.
- Getting a permit ensures your deck is safe, meets code, can add value to your home, and protects you legally and with insurance.
Why You Need a Deck Permit Before You Build
So, you’re thinking about adding a deck to your home. Awesome! It’s a great way to expand your living space outdoors and really make the most of your yard. But before you grab your hammer and nails, there’s a really important step you can’t skip: getting a permit.
Think of a permit as your official “go ahead” from the local government that says your deck plans meet all the safety rules. It might seem like a bit of a hassle, but a rooftop deck permit is actually there to protect you, your family, and anyone who might use your rooftop deck in the future. Building without one can lead to some serious headaches down the road.
Here’s why it’s so important:
- Safety First: Local building codes are designed to make sure your deck is structurally sound. This means it can handle the weight of people, furniture, and snow, and won’t collapse or fall apart. Inspectors check your plans and the actual build to make sure everything is up to snuff.
- Legal Compliance: Your town or city has rules about what you can build and where. A permit process makes sure your deck fits within those rules, like setback requirements from property lines or height restrictions.
- Insurance and Resale Value: If something were to happen on your deck, your homeowner’s insurance might not cover it if it wasn’t built with a permit. Plus, when you decide to sell your house, unpermitted work can cause major problems and lower your home’s value. Buyers and their inspectors will notice.
Building without a permit can lead to fines, having to tear down your work, or even legal trouble if someone gets hurt. It’s just not worth the risk.
While some very small siding replacement projects might be exempt in certain areas, it’s always best to check. Don’t assume you don’t need a permit—find out for sure before you start buying materials.
When You Need a Permit to Build a Deck
So, you’re thinking about building a deck. Awesome! Before you start dreaming about barbecues and summer evenings, there’s a pretty important step you can’t skip: getting the right permits. Most of the time, if your deck is going to be attached to your house, or if it’s going to be a certain size or height, you’ll need a building permit. It’s not just about following rules; these local deck building regulations are there to make sure your deck is safe for everyone who uses it, now and in the future. Think of it like this: building without a permit is like trying to bake a cake without a recipe – it might turn out okay, but there’s a good chance something will go wrong.
Generally, you’ll need a permit if:
- Your deck will be attached to your home.
- The deck will be more than a certain height off the ground (this varies by location).
- The deck will be a certain size or larger (again, check local rules).
- You’re replacing an existing deck, especially if the original had issues.
- You’re extending an existing deck.
There can be exceptions, of course. Sometimes, very small, ground-level decks that aren’t attached to the house might not require a permit. But honestly, it’s always better to check with your local building department. They’re the ones who know the exact steps to get a construction permit for a deck in your specific area. Trying to figure out what permits are needed for a deck can feel a bit confusing, but it’s a necessary part of the process. Even if you’re hiring Deck Builder services, it’s good to have a basic understanding of the home improvement permit application for a deck yourself.
Building without the proper permits can lead to fines, having to tear down your work, or even issues when you try to sell your home later. It’s a headache you definitely want to avoid.
Don’t confuse this with a building permit for renovations; deck permits are specifically for exterior structures. If you’re in a place like Montreal, you’ll have your own specific permit in Montreal for renovation projects, including decks. The key takeaway is to always confirm with your local authorities before you buy a single piece of lumber.
Step 1: Check Your Property Zoning and Bylaws
Alright, before you even start sketching out that dream deck, you absolutely have to get a handle on your local rules. Think of it like this: you wouldn’t start building a house without knowing where the property lines are, right? Same idea here. Your town or city has specific rules about what you can and can’t build, and where you can build it. These are usually called zoning laws and bylaws.
The biggest thing to figure out is your property’s zoning. This tells you what the land is designated for – residential, commercial, etc. – and dictates a lot of what’s allowed. You’ll also need to know about setback requirements. These are basically minimum distances your deck (or any structure) has to be from your property lines, streets, and sometimes even other buildings on your lot. These aren’t just random numbers; they’re in place to keep things safe, like preventing fires from spreading easily, and to maintain the look and feel of the neighborhood. Some areas might have stricter rules than others, especially if you’re on a corner lot or in a densely built area.
Here’s a quick rundown of what to look for:
- Setbacks: How far your deck must be from property lines (front, back, and sides).
- Lot Coverage: The maximum percentage of your property that can be covered by structures.
- Height Restrictions: Limits on how tall your deck can be.
- Easements: Areas on your property that might be reserved for utility access or other public uses, which can affect where you can build.
You might think these rules are just a hassle, but they’re really there to make sure everyone’s property is usable and safe, and that the neighborhood stays pleasant for everyone. Ignoring them can lead to big headaches later, like having to tear down something you just built.
Sometimes, you might find that your ideal deck design doesn’t quite fit the existing rules. If that happens, don’t despair just yet. You might be able to apply for a variance, which is basically asking for an exception to the rule. This process can take time and might involve proving a hardship, and there’s no guarantee it’ll be approved. It’s best to check with your local planning department early on to see what your options are.
Step 2: Design and Plan Your Deck
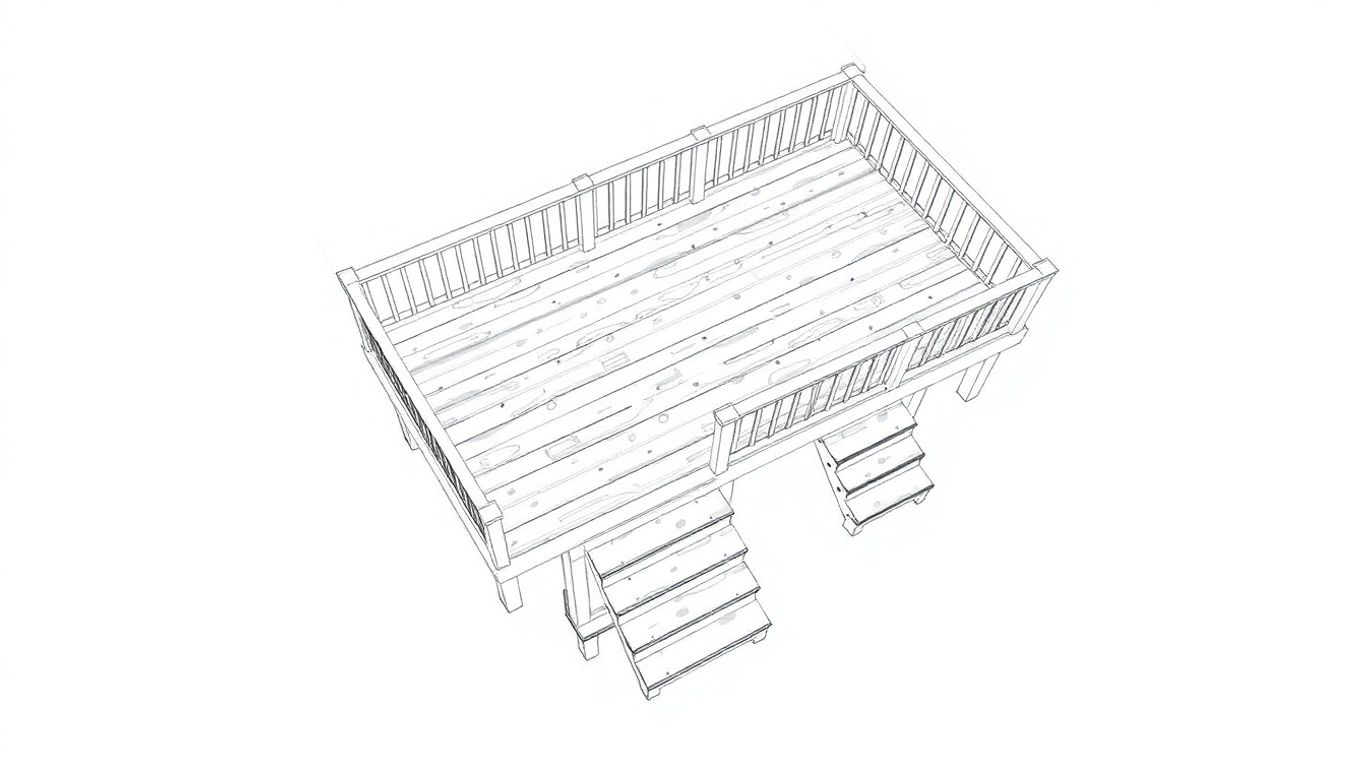
Alright, so you’ve figured out you need a permit, which is great. Now comes the fun part – actually designing the deck you want. This isn’t just about picking out pretty wood or fancy railings, though that’s part of it. You need to create detailed plans that the building department can understand. Think of it like giving someone instructions to build your deck without you being there.
Your deck plans need to be drawn to scale and show all the nitty-gritty details. This usually means an overhead view, often called a framing plan, and sometimes a side or front view (an elevation drawing) too. You can use special software for this, or if you’re feeling old-school, graph paper works, as long as it’s neat and clear. The key is that someone looking at your plans should be able to figure out exactly how the deck will be built.
Here’s a breakdown of what typically needs to be on those plans:
- Footings: Where will they go? How big will they be? How deep do they need to go? This is super important for stability.
- Framing: What size beams and joists will you use? How far apart will they be spaced? This is the skeleton of your deck.
- Materials: What kind of wood or composite material are you using for the decking and railings? What about the hardware and fasteners? Make sure any special materials are approved for use in your area.
- Stairs and Railings: If your deck has stairs or railings, you need to show how they’ll be built, including height and spacing.
- Ledger Board: How will the deck attach to your house? This connection needs to be clearly detailed.
Beyond the deck itself, you’ll also need a site plan. This shows how the deck fits onto your property. You’ll need to mark property lines, the house’s location, and how far the deck will be from property lines and any other structures. If you have an old property survey, that’s a great starting point. If not, you might need to take careful measurements yourself.
Don’t skimp on the planning stage. A well-thought-out design not only helps you get your permit faster but also makes the actual Deck Installation or Deck Renovations process smoother and safer. It’s better to catch mistakes on paper than when you’re halfway through building.
Think about how you’ll use the space. Will it be for big parties, or just quiet mornings with coffee? This can influence the size and shape. Also, consider the materials. Wood is classic, but composite or PVC might be easier to maintain. Whatever you choose, make sure it’s durable and fits your budget. Getting these plans right is a big step towards a successful project.
Step 3: Prepare Your Permit Application
Alright, so you’ve got your design all figured out and you’ve checked the local rules. Now comes the part where you actually fill out the paperwork. This is where you officially ask the city or county for permission to build your deck. It might seem like a lot, but taking your time here can save you headaches later.
First things first, you’ll need to get the actual application form. Most places have these available online on their building department’s website. Sometimes you can download it, other times you might fill it out right there on their portal. Make sure you’re getting the right form for decks or accessory structures.
When you fill it out, be ready to provide a bunch of details. They’ll want to know your name, address, and contact info, of course. Then, it’s all about the deck itself:
- Deck Dimensions: Length, width, and height off the ground.
- Materials: What kind of wood, fasteners, and foundation will you use?
- Location on Property: How far is it from property lines (setbacks)?
- Footing Details: How deep and wide will your support posts be?
- Railing Information: Height and spacing of balusters, if applicable.
Don’t guess on these numbers; use your plans! Accuracy is key here. If you’re using a contractor, they’ll likely handle a lot of this, but it’s good to know what’s being submitted.
Beyond the form itself, you’ll need to attach supporting documents. This usually includes at least two sets of your detailed deck plans. These plans need to show everything we just talked about, drawn to scale. You might also need a site plan showing where the deck fits on your property, including existing structures and property lines. Some areas might ask for soil reports, especially if you’re on tricky ground, but that’s less common for a standard deck.
Remember, the goal of the application is to show the building department that your deck will be safe, won’t cause problems for your neighbors, and meets all the local building codes. Be thorough and honest.
If you’re hiring a contractor, they’ll need to provide proof of their license and insurance. This is a standard requirement in most places. Once everything is filled out and you have all your documents ready, you’re set for the next step: submitting the application. You can usually find information on the permit application process on your local government’s website.
Step 4: Submit Your Application
Alright, you’ve put in the work designing your deck and filling out all the paperwork. Now comes the part where you actually hand it all over to the city or county. This is a big step, so make sure everything is in order before you hit that submit button.
Most places these days use an online portal for this. You’ll likely get an email with instructions on how to log in and upload your documents. This usually includes your deck plans, site survey, and the application form itself. It’s like sending a digital package to the permit office.
Here’s a general idea of what to expect:
- Online Portal: Look for an email with a link to a system like ProjectDox or a similar online platform. This is where you’ll upload everything.
- Double-Check: Before you finalize the upload, give everything one last look. Are all the pages there? Is the file format correct? Did you attach the right documents?
- Confirmation: Once you submit, you should get some kind of confirmation, either on screen or via email. Keep this handy – it’s your proof of submission.
Sometimes, you might need to pay a small initial fee just to get the application into the system. Don’t be surprised if this happens. It’s usually a fraction of the total permit cost.
If your town or city still does things in person, you’ll need to find out where to go and what their specific submission process is. It might involve dropping off physical copies or even scheduling an appointment. Whatever the method, just remember to be thorough. Getting this right now saves a lot of headaches later.
Step 5: Schedule and Complete Inspections
Alright, so you’ve gotten your permit approved and you’re ready to start building. But hold on a sec, it’s not quite a free-for-all yet. This is where the inspections come in, and they’re super important. Think of them as checkpoints to make sure everything is being built safely and according to the plans you submitted. Skipping these or doing them out of order is a surefire way to cause headaches later on.
You’ll typically need inspections at different stages of your deck construction. The exact timing and what they check for can vary a bit depending on your local municipality, but here’s a general idea of what to expect:
- Footing Inspection: This happens before you pour any concrete for your deck’s supports. They want to see that the holes are dug to the right depth and size, and that everything is ready for concrete. If you’re using special footings like helical piers, there might be specific requirements for this inspection, like submitting torque reports.
- Framing Inspection: Once the main structure of your deck and stairs is built – the joists, beams, and railings are up – but before you put down the deck boards or any finishing touches. This is to check that the framing is strong, properly connected, and meets all the code requirements for load-bearing.
- Final Inspection: This is the last one, done after the entire deck is finished. The inspector will check everything one last time – the footings, the ledger board attachment to your house, the framing, railings, stairs, and overall stability. They want to make sure it’s all done correctly and safely.
It’s really on you to schedule these inspections. Don’t wait for the city to call you. Most permit offices have a system, often online, where you can request an inspection. Make sure you know which inspection is needed at each stage and schedule it in advance. Sometimes, you might need to give them a few days’ notice, especially during busy building seasons. If you’re using Renovation Services In Montreal And Laval, they’ll usually handle this scheduling for you, but it’s always good to be aware of the process.
Failing an inspection means you’ll have to fix whatever the inspector found wrong and then schedule another inspection. This can really slow down your project and add unexpected costs, so it’s best to get it right the first time. Double-checking your plans and making sure your builders are following them closely is key.
Remember, the goal of these inspections is safety. They’re there to protect you, your family, and anyone who uses the deck. So, work with the inspectors, be prepared, and get those approvals!
Step 6: Get Final Approval and Close Your Permit
Alright, you’ve made it through the inspections, and the inspector gave your deck the thumbs up. That’s fantastic news! But hold on, you’re not quite done yet. The last step is getting that official final approval and closing out your permit. This is super important because it means your project is officially on the books as compliant with all the local rules and regulations.
So, what does this actually involve? Usually, after the final inspection passes, the inspector will tell you what needs to happen next. Sometimes, they’ll give you a temporary sign-off right there, and the final paperwork will follow. Other times, you might need to submit a few more documents or wait for the city to mail you the official approval letter. This final sign-off is your proof that the deck was built to code.
Here’s a quick rundown of what typically happens:
- Receive Final Inspection Report: The inspector will leave you with a report detailing the inspection results. Make sure you understand everything on it.
- Address Any Outstanding Issues: If, by some slim chance, the inspector found something minor that needs fixing, you’ll need to get that done and schedule a re-inspection.
- Pay Final Fees (if any): Sometimes there are small administrative fees or final payments due at this stage. Check with your local building department.
- Obtain Certificate of Occupancy/Completion: This is the official document that says your deck is good to go. Keep this somewhere safe!
It’s a good idea to keep all your permit-related documents together, including the approved plans, inspection reports, and that final approval. This paperwork is useful if you ever decide to sell your home, as it shows buyers that everything was done correctly. It can also be helpful for insurance purposes.
Don’t just assume the permit is closed once the final inspection passes. Always follow up with the building department to confirm that all necessary steps have been taken and that the permit is officially closed out in their system. This prevents potential headaches down the road.
Think of closing your permit like getting the final receipt after a big purchase. It’s the official end of the process and gives you peace of mind knowing everything is squared away legally. You can now officially enjoy your new deck without any lingering worries about permits or inspections. You’ve successfully completed the building permit application process!
Common Mistakes to Avoid
Building a deck is exciting, but it’s easy to trip up during the permit process. A lot of folks just want to get started, and they skip steps or assume things are okay when they’re not. This can lead to big headaches down the road.
One of the biggest slip-ups is not doing your homework upfront. This means not checking local zoning rules, like how far your deck needs to be from property lines (setbacks), or not understanding the specific building codes for decks in your area. These codes cover things like footing depth, railing height, and how the deck attaches to your house. Ignoring these details can mean you have to tear down part of your deck or even the whole thing.
Another common problem is submitting an incomplete application. You might forget to include detailed drawings, miss a required signature, or not provide all the necessary information about materials. This just slows everything down because the permit office will have to come back to you for more info, and your application will sit on the back burner.
Here are some other pitfalls to watch out for:
- Not getting inspections at the right time: You need to schedule inspections before you cover up certain parts of the deck. For example, footings need to be inspected after the holes are dug but before concrete is poured. Framing needs a look-over before you put down the decking.
- Deviating from the approved plans: Once your plans are approved, you need to build according to them. Making changes without getting them approved first is a recipe for a failed inspection.
- Assuming a contractor will handle everything: While good contractors usually manage the permit process, it’s still your responsibility to make sure it’s done correctly. Always confirm they’ve pulled the right permits and are building to code.
Sometimes, people think they can just build a deck and hope nobody notices, especially if it’s a small addition. But if a neighbor complains, or if you ever need to sell your house, unpermitted work can cause major problems. Lenders might not approve a mortgage, and you could be forced to get retroactive permits, which are often more expensive and complicated.
Finally, don’t forget about your Homeowners Association (HOA), if you have one. They often have their own rules on top of city regulations, and you’ll need their approval too. Skipping these steps can lead to fines or having to undo work.
Expert Tips for a Smooth Permit Process
Okay, so you’re ready to get this deck permit sorted. It can feel like a maze sometimes, but a few smart moves can make it way less painful. First off, don’t guess about what you need; always check with your local building department directly. They’re the ones who hold the keys, and their requirements can change. A quick call or visit to their website can save you a ton of headaches down the road.
When you’re putting your application together, be thorough. Think about including:
- Detailed drawings: Make sure your plans show everything clearly, like the size and spacing of your footings, beams, and joists. They often want to see how you’ll attach the ledger board and details about railings and stairs.
- Site plan: This shows where the deck will sit on your property, including any property lines or easements.
- Material list: Sometimes they want to know what you’re building with.
It’s also a good idea to talk to a plan examiner before you finalize your drawings if you can. They might have a list of the most common reasons permits get denied in your area, like undersized beams or missing hardware details for railings. Getting that feedback early can prevent a lot of back-and-forth.
Remember, the permit fee is just one part of the cost. If your plans aren’t detailed enough or don’t meet code, you might end up paying more in the long run for revisions or even having to redo work. Being precise upfront is usually the cheapest way to go.
Don’t forget to factor in the time it takes for reviews. Some applications get processed pretty quickly, but others can take weeks, especially if they’re complex or if the department is swamped. Try to get your application in well before you plan to start building. You can find more information on the construction permit application process if you need it.
Getting your building permits can feel like a puzzle, but it doesn’t have to be a headache. Renovation contractors have put together some simple advice to help you navigate the process smoothly. Want to learn more about making your permit journey easy? Visit our website for all the details and helpful tips!
Frequently Asked Questions
Do I always need a permit to build a deck?
In most cases, yes, you’ll need a permit to build a deck. Permits are usually required for structures attached to your house or those that are a certain size or height. Even if your deck is small and low to the ground, it’s best to check with your local building department just to be sure. Skipping this step could lead to fines or having to take down your new deck.
How much does a deck permit cost?
The cost of a deck permit can vary a lot depending on where you live. In smaller towns, it might be around $75, but in bigger cities, it could cost a few hundred dollars. The fee helps cover the cost of reviewing your plans and inspecting your work to make sure everything is safe and follows the rules.
What documents do I need to apply for a deck permit?
You’ll typically need a completed application form, usually two sets of construction plans that show how the deck will be built, and a site plan showing where it will go on your property. If you’re hiring a contractor, they’ll also need to show proof of their license. Don’t forget you’ll also have to pay a permit fee.
What are common reasons a deck permit application might be denied?
Permit applications can be denied for a few common reasons. Sometimes the plans don’t have enough detail about how things like railing posts will be attached securely. Other times, the materials chosen might not be strong enough for the size of the deck, or the plans might not account for special needs like earthquake safety in certain areas.
How long does it take to get a deck permit?
Getting a permit usually takes a couple of weeks, but it can sometimes take a month or even longer, especially if your plans need adjustments or if you have to apply for special permissions called zoning variances. It’s a good idea to start this process early so it doesn’t delay your building project too much.
What happens after my deck is built if I have a permit?
Once your deck is finished, you’ll need to schedule a final inspection. An inspector will come out to make sure the deck was built exactly according to the approved plans and meets all safety rules. If everything checks out, you’ll get final approval, and your permit will be closed. This means your deck is officially approved and legal.
